
Why Square Aviator Sunglasses Show Every Fit Problem (and How to Fix Each One at Home)
Square aviator sunglasses have a straight bar running across the top of the frame. That bar is why people buy them: it gives the aviator a flat, deliberate line. It's also why a pair that sits a little off looks obviously off. A teardrop aviator can ride slightly crooked and nobody notices. A square aviator can't.
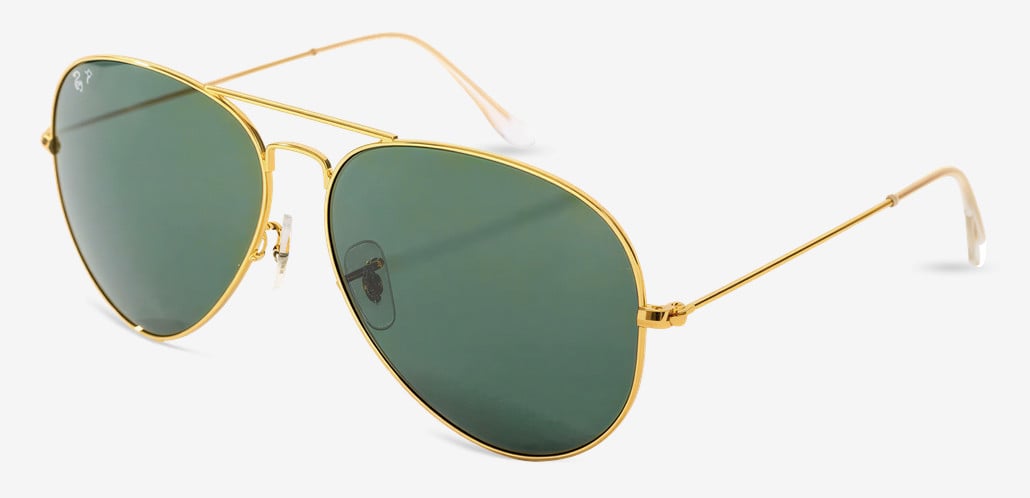
The same construction that exposes fit problems also makes them fixable. Most square aviators are thin metal with nose pads on adjustable arms, which gives them more adjustment points than almost any other sunglass style.
This guide covers three things:
- How to tell what's actually wrong.
- The order to make adjustments in, which matters more than most guides admit.
- The few spots you should leave alone.
Short answerBefore bending anything, set the frame upside down on a table to check whether it's level. Then adjust in this order: hinge screws, temple level, nose pad width, nose pad height and distance, temple tips, and a final re-check. Never bend the lens rims or the ends of the top bar, and never bend the same spot back and forth.
The top bar is a level you wear on your face
People are unusually good at noticing when a line that should be horizontal isn't. Perception researchers call this the oblique effect: we judge horizontal and vertical lines more precisely than lines at other angles (Appelle, 1972).
A square aviator puts a long, straight, nearly horizontal line right across your face, so small tilts register quickly. Here is how small those tilts are across a typical 140 mm frame:
| Tilt | Height difference, one end of the frame to the other |
|---|---|
| 0.5° | about 1.2 mm |
| 1° | about 2.4 mm |
| 2° | about 4.9 mm |
Level
0.5° about 1.2 mm
1° about 2.4 mm
2° about 4.9 mm
Each line is drawn at its real angle. On a straight bar, even 1° is easy to spot.
A two-millimeter drop is barely enough to measure with a ruler, but it's easy to see when it runs along a straight metal bar. Round, cat-eye, and teardrop shapes have no continuous straight edge, so the same tilt hides in their curves. That's why a friend's classic aviators can look fine while your square aviator sunglasses look "off" at exactly the same fit.

Frame or face? Two checks before you bend anything
The table test
Open the temples, turn the sunglasses upside down, and rest them on a flat table on the top bar. The flat top line of a square aviator makes this easier than with almost any other shape, because the frame sits steady on the bar. Both temple tips should touch the table.
- One tip floats in the air: the frame itself is out of level. Start at Step 2 below.
- Both tips touch, but the pair still looks crooked when you wear it: the frame is fine and your ears likely sit at slightly different heights. That's common and nothing to worry about. You'll still fix it at Step 2, bending the frame to match your face rather than to match the table.
The phone grid check
Turn on your camera's grid overlay. On iPhone it's under Settings > Camera > Grid; on most Android phones, look for "grid lines" in the camera app's settings.
Prop the phone upright at eye level, use the front camera, and line the top bar up against a horizontal grid line. Take the photo instead of judging in a mirror. It's hard to hold your head level while you're looking at yourself, and a photo removes that problem.
Every adjustment point on a square aviator
| Part | What it changes | Do it yourself? |
|---|---|---|
| Hinge screws | Temple wobble and tension | Yes |
| Nose pad width | How high the frame rides on your nose | Yes, gently |
| Nose pad height | Where the top bar lands against your brows | Yes |
| Nose pad distance | Whether your lashes touch the lenses | Yes |
| Nose pad angle | Red marks and pressure spots | Fingertips only |
| Temple angle at the hinge area | Level, and lens tilt | Carefully |
| Temple tip curve | Grip behind the ear | Yes |
| Front curve (wrap) | How the frame follows the sides of your head | Take it to a shop |
One caveat: square aviator styles with an acetate front and a molded bridge lose the nose pad rows of this table entirely. They're less adjustable by design, so fit matters more when you buy them.
The tuning order
Every adjustment moves the reference point for the next one. If you set nose pad height before leveling the temples, you're measuring against a tilted frame and you'll end up chasing the problem back and forth. Work in this order even if you think only one thing is wrong.
Step 1: Tighten the hinge screws
A loose hinge lets the temple droop and makes every later check unreliable.
- Tool: most eyewear screws take a #000 Phillips or a 1.4 to 1.6 mm flathead driver, which you'll find in eyeglass repair kits.
- How tight: turn until snug, then stop. Over-tightening can strip the thread or crack the hinge barrel.
- If a screw keeps backing out: a tiny dot of clear nail polish on the screw head holds it. Keep the polish away from the lenses.
Step 2: Level the temples
If the right lens sits higher, bend the right temple slightly upward near the hinge. That lowers the right side of the front. Bending the left temple slightly downward does the same job from the other side.
- Hold the frame front firmly next to the hinge, never by the lens.
- Bend the temple with your other hand, a degree or two at a time.
- Re-run the table test or grid photo after each small move.
If your ears sit at different heights, level against the grid photo, not the table.
Step 3: Set nose pad width to control how high the frame rides
Your nose widens as it goes down. Pads set closer together stop higher on the nose; pads set wider apart stop lower. As a rough rule of geometry, on an average nose, bringing the pads about 1 mm closer together lifts the frame about 1 mm. On a narrow bridge the lift is a bit more.
Press both pad arms by the same amount with your thumbs. Uneven pads undo the leveling you did in Step 2.
Step 4: Set nose pad height and distance for your brows and lashes
The top bar should sit close to your brows without swallowing them. If the frame rides too high, move the pads slightly higher on their arms, which lowers the frame. If it rides too low, move the pads lower.
Your lashes should clear the lenses on a full blink. If they touch, extend the pad arms slightly so the pads sit farther behind the lenses. That moves the whole front away from your face.
Step 5: Shape the temple tips for grip
The temple should begin to curve just behind the top of your ear, then follow the back of the ear without pressing into it.
- Pair slides forward when you look down, and the pads are already right: the tips are usually too straight. Add a little more curve.
- Pressure behind the ears: the curve is too tight. Relax it slightly.
- Plastic sleeves on the tips: dip them in warm tap water for a few seconds first so they bend without cracking. Never apply heat to the metal parts.
Step 6: Re-check everything
Repeat the table test and the grid photo. Then wear the pair for ten minutes and look down at your phone a few times; that's the quickest way to find out whether it slides. Small refinements now are normal. Large ones mean you should go back to the step that controls that problem.
Where to start if you already know the symptom
| Symptom | Likely cause | Start at |
|---|---|---|
| Slides down when you look down | Pads set too wide, or temple tips too straight | Step 3, then Step 5 |
| One side sits higher | Temple angle, or ears at different heights | Step 2 |
| Lashes brush the lenses | Pads sit too close behind the lenses | Step 4 |
| Top bar covers your brows | Frame riding too high | Steps 3 and 4 |
| Red marks on the nose | Pad angle, or weight resting on a small spot | Step 4, or try larger silicone pads |
| Pressure behind the ears | Temple tips curved too tightly | Step 5 |
| Temples wobble or drop | Loose hinge screws | Step 1 |
| Lower corners touch your cheeks | Frame riding low, or too much lens tilt | Step 3; take tilt changes to a shop |
Five things not to bend (or bend twice)
- The rims around the lenses. Bending a rim changes how the lens sits in it. At best the lens loosens; at worst it pops out or chips. Polarized lenses in particular shouldn't be forced.
- The ends of the top bar. These are usually solder joints, and the straightness of the bar is the whole point of a square aviator. A kinked bar can't be un-kinked cleanly.
- The same spot back and forth. Thin metal hardens and weakens each time it's bent, then cracks. Decide the direction before you bend, and make small moves.
- Plated finishes, with bare pliers. Metal jaws scratch the coating. Use your fingers, or wrap the pliers in a microfiber cloth. Plated finishes also wear fastest where they're handled, so handle them as little as possible. Our gold aviator sunglasses guide covers plating in detail.
- Memory metal frames. Frames sold as flexible or made from titanium alloys are designed to spring back to shape. Home adjustments often won't hold, and forcing them can snap a part. These are shop jobs.
Nose pads: the cheapest fix most people skip
On an older pair, many fit complaints come down to worn pads rather than a bent frame.
Pad types. Nose pads attach in one of two ways: screw-in pads are held by a tiny screw through the pad, and push-in (snap-on) pads click onto a small post. Check which one you have before ordering replacements. Replacement pads come in several lengths, so measure your old pad or match it by eye.
Materials. Silicone pads grip well but turn yellow, stiff, or tacky over time. Hard plastic pads last longer but slide more easily. Air-cushion pads spread the weight over a larger area, which helps if you get marks on your nose.
When to replace them: as soon as a pad is yellowed, hardened, cracked, or sticky. Don't go by a calendar.
If you're still shopping: fit things to check before you buy
Nose pads on arms. If you want the adjustments above to be possible, choose frames with pad arms rather than a molded bridge. On our square aviator sunglasses page, use the adjustable nose pads filter.
Temple style. Aviators have used three main temple styles:
| Temple style | What it does | Best for |
|---|---|---|
| Straight ("library") | Slips on without curving behind the ear | Short wear, over-the-hat looks |
| Skull | Curves down behind the ear | Everyday wear; most common today |
| Cable (riding bow) | Wraps around the ear | Staying put during activity; slower to put on and take off |
Frame width. Square aviators tend to run wide. Compare the total frame width on the product page with a pair you already like.
Try on before you buy. Virtual Try-On shows you where the top bar lands before any of this becomes necessary.
When to hand it to a pro
Take the pair to an optical shop if you're dealing with any of these:
- Memory metal or titanium frames.
- A front that needs more or less wrap.
- A broken solder joint.
- A stripped screw.
- A lens that has come loose.
Many optical shops will adjust frames quickly even if you didn't buy them there, sometimes for free. Policies vary, so call ahead.
If your pair is new, check the warranty and return policy before making any home adjustments, because some policies treat bending damage differently from manufacturing defects.
FAQ
Can you adjust square aviator sunglasses at home?
Yes, for most metal square aviator sunglasses with nose pads on arms. Hinge screws, nose pad width, height and angle, and temple tip curves are all home-safe if you use small movements. Rims, top-bar joints, front wrap, and memory metal frames are better left to a shop.
Why do my square aviators keep sliding down my nose?
Usually one of two causes: the nose pads are set too far apart, so the frame sits low where the nose is wider, or the temple tips are too straight to hold behind your ears. Narrow the pads slightly first, then add a little curve to the tips.
Why do my sunglasses look crooked even though they aren't bent?
If the frame passes the table test but looks tilted on your face, your ears likely sit at slightly different heights. That's common. Bend one temple slightly near the hinge to level the frame on your face rather than on the table.
How tight should sunglasses be behind the ears?
Snug enough that the pair stays put when you look down, but loose enough that there's no pressure spot. The temple should follow the back of your ear, not press into it.
How do I know which replacement nose pads to buy?
Check how your current pads attach, screw-in or push-in, and match the length of your old pad. Silicone grips better, and hard plastic lasts longer.
Sources
- Appelle, S. (1972). Perception and discrimination as a function of stimulus orientation: The "oblique effect" in man and animals. Psychological Bulletin, 78(4), 266–278.
- ANSI Z80.3, American National Standard for Ophthalmics – Nonprescription Sunglass and Fashion Eyewear Requirements.